Simple Machines Stations
star
star
star
star
star
Last updated almost 4 years ago
18 Nsɛmmisa
Quick reminder of the Simple Machines!
10
Simple Machines Stations
STATION 1 - INCLINED PLANE

STATION 1 - INCLINED PLANE - PURPOSE
You will figure out which type of inclined plane is most efficient (using less force) at moving objects from the ground level up to a higher position.
Bill Nye - Inclined Plane
Background Information for Inclined Planes (if needed)
10
STATION 1 - INCLINED PLANE - MATERIALS
- plank of wood
- books
- truck with rocks in back
- string
- meter stick
- spring scale
- something to keep bottom of ramp from sliding (clay?)
IF SOMETHING IS MISSING, TELL THE TEACHER
STATION 1 - INCLINED PLANE - SET UP
STATION 1 - INCLINED PLANE - PROCESS
10
10
10
10
10
SIDENOTE: Work and Simple Machines
We've looked at some examples and uses for simple machines. They have one job right? To do the work for us! But how can we figure out HOW MUCH work is being done?
This quick video explains how work is calculated. Watch carefully; you'll be doing the same thing in a minute :)
This quick video explains how work is calculated. Watch carefully; you'll be doing the same thing in a minute :)
10
10
10
STATION 2 - LEVER

STATION 2 - LEVER - PURPOSE
This lab is to allow you to investigate different lever designs and identify the advantages and disadvantages of each one.
TED Talks - Levers
Background information on levers (if needed)

10
STATION 2 - LEVERS - MATERIALS
- Ruler (30 cm)
- Marker
- Clay
- Tape
- 2 paper cups
- A small rock or other weight
- Handful of pennies
IF SOMETHING IS MISSING, TELL THE TEACHER
STATION 2 - LEVER SET UP/PROCEDURES
10
10
10
10
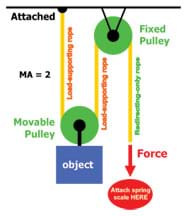
STATION 3 - PULLEY

STATION 3 - PULLEY - PURPOSE
After this activity, students should be able to describe how pulleys make work easier for engineers and describe everyday examples of pulleys used by engineers.
Information on Pulleys
Background Information on Pulleys (if needed)
10
STATION 3 - PULLEY - MATERIALS
- Ruler
- string/thin rope
- pulley set ups
- spring scales
- weights
- object to lift
IF SOMETHING IS MISSING, TELL THE TEACHER
STATION 3 - PULLEY SET UP/PROCEDURES
10
10