Twa kɔ nsɛm atitiriw so
Log in
Sign up for FREE
arrow_back
Laabri

Chapter 5 Review

star
star
star
star
star
Last updated about 4 years ago
97 Nsɛmmisa

For the next 5 questions, state the third congruence that must be given to prove that \triangle{ABC} \cong \triangle{DEF} using the indicated postulate. Use the "=" symbol for congruence.

1
1
1
1
1

For the next 4 questions, tell whether you can use the given information to determine if \triangle{ABC} \cong \triangle{DEF}. If they are congruent, state the postulate that allows you to do so. If they are not congruent, state "Not Congruent".

1
1
1
1
2

Every proof in this review is displayed in two different sections. In the first section, reorder the statements in the correct order. In the second section, using the correct order from the first section, determine each reason associated with each correct statement.

1
1
1
1
1
1
1
1

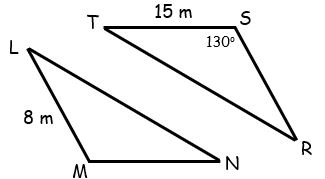
In the diagram below, \triangle{LMN} \cong \triangle{RST}. Complete each statement for the next 6 questions.
1
Asemmisa {{asɛmmisaAhyɛnsode}}
1.

\overline{MN} \cong ___________

1
Asemmisa {{asɛmmisaAhyɛnsode}}
2.

MN = ___________

1
Asemmisa {{asɛmmisaAhyɛnsode}}
3.

m\angle{M} = _______

1
Asemmisa {{asɛmmisaAhyɛnsode}}
4.

\overline{SR} \cong _______

1
1

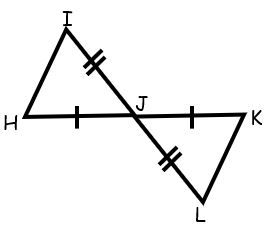
If the two triangles can be proven congruent, choose the correct congruence postulate, then write a congruence statement. If they cannot be proven congruent, choose None, and write "None" for a congruence statement.
1
Asemmisa {{asɛmmisaAhyɛnsode}}
7.

Congruence Postulate

1

If the two triangles can be proven congruent, choose the correct congruence postulate, then write a congruence statement. If they cannot be proven congruent, choose None, and write "None" for a congruence statement.
1
Asemmisa {{asɛmmisaAhyɛnsode}}
9.

Congruence Postulate

1

If the two triangles can be proven congruent, choose the correct congruence postulate, then write a congruence statement. If they cannot be proven congruent, choose None, and write "None" for a congruence statement.
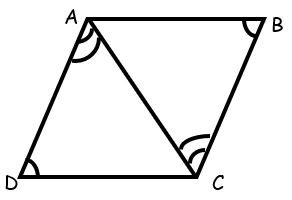
1
Asemmisa {{asɛmmisaAhyɛnsode}}
11.

Congruence Postulate

1

If the two triangles can be proven congruent, choose the correct congruence postulate, then write a congruence statement. If they cannot be proven congruent, choose None, and write "None" for a congruence statement.
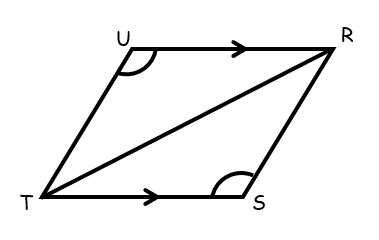
1
Asemmisa {{asɛmmisaAhyɛnsode}}
13.

Congruence Postulate

1

If the two triangles can be proven congruent, choose the correct congruence postulate, then write a congruence statement. If they cannot be proven congruent, choose None, and write "None" for a congruence statement.
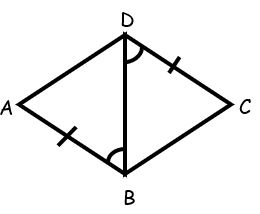
1
Asemmisa {{asɛmmisaAhyɛnsode}}
15.

Congruence Postulate

1

If the two triangles can be proven congruent, choose the correct congruence postulate, then write a congruence statement. If they cannot be proven congruent, choose None, and write "None" for a congruence statement.
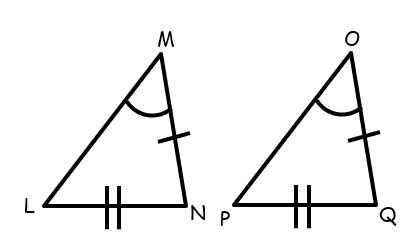
1
Asemmisa {{asɛmmisaAhyɛnsode}}
17.

Congruence Postulate

1

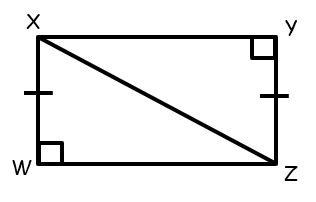
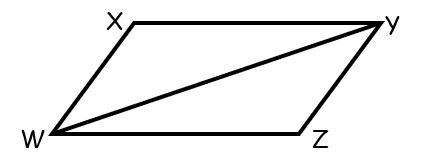
Using the diagram below, for the next 2 questions, name the included angle between each pair of sides given. Do not include the angle symbol.
1
Asemmisa {{asɛmmisaAhyɛnsode}}
19.

XY and YW

1
Asemmisa {{asɛmmisaAhyɛnsode}}
20.

ZW and YW

Asemmisa {{asɛmmisaAhyɛnsode}}
21.

\overline{AB} \cong \overline{DE}, \overline{CB} \cong \overline{FE}

Use the SSS Congruence Postulate

Asemmisa {{asɛmmisaAhyɛnsode}}
22.

\angle{A} \cong \angle{D}, \overline{CA} \cong \overline{FD}

Use the SAS Congruence Postulate

Asemmisa {{asɛmmisaAhyɛnsode}}
23.

\angle{A} \cong \angle{D}, \angle{B} \cong \angle{E}

Use the ASA Congruence Postulate

Asemmisa {{asɛmmisaAhyɛnsode}}
24.

\angle{A} \cong \angle{D}, \angle{B} \cong \angle{E}

Use the AAS Congruence Postulate

Asemmisa {{asɛmmisaAhyɛnsode}}
25.

\angle{A} and \angle{D} are right angles, \overline{AB} \cong \overline{DE}

Use the HL Congruence Postulate

Asemmisa {{asɛmmisaAhyɛnsode}}
26.

\angle{B} \cong \angle{E}, \angle{C} \cong \angle{F}, \overline{AC} \cong \overline{DF}

Asemmisa {{asɛmmisaAhyɛnsode}}
27.

\overline{AB} \cong \overline{DE}, \overline{BC} \cong \overline{EF}, \overline{AC} \cong \overline{DF}

Asemmisa {{asɛmmisaAhyɛnsode}}
28.

\angle{A} \cong \angle{D}, \overline{AB} \cong \overline{DE}, \overline{AC} \cong \overline{DF}

Asemmisa {{asɛmmisaAhyɛnsode}}
29.

\angle{C} \cong \angle{F}, \overline{AC} \cong \overline{DF}, \overline{AB} \cong \overline{DE}

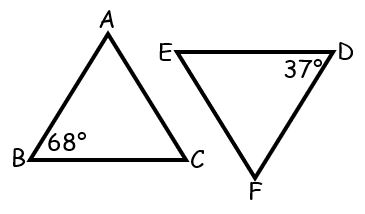
In the diagram below, \triangle{ABC} \cong \triangle{DEF}. Complete each statement for the next 6 questions.

1
Asemmisa {{asɛmmisaAhyɛnsode}}
30.

m\angle{C} = _______

1
Asemmisa {{asɛmmisaAhyɛnsode}}
31.

\overline{BC} \cong ___________

1
Asemmisa {{asɛmmisaAhyɛnsode}}
32.

\overline{DE} \cong ___________

1
Asemmisa {{asɛmmisaAhyɛnsode}}
33.

m\angle{A} = _______

1
1

Use the diagram below for the next 2 questions.
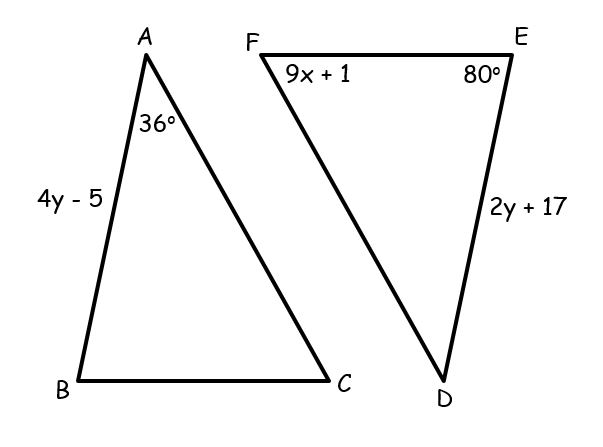
\triangle{ABC} \cong \triangle{DEF}

1
Asemmisa {{asɛmmisaAhyɛnsode}}
36.

Find the value of x.

1
Asemmisa {{asɛmmisaAhyɛnsode}}
37.

Find the value of y.

Use the diagram below for the next 2 questions.
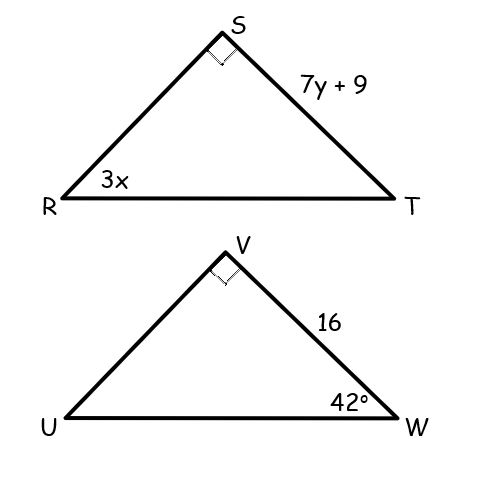
\triangle{RST} \cong \triangle{UVW}

1
Asemmisa {{asɛmmisaAhyɛnsode}}
38.

Find the value of x.

1
Asemmisa {{asɛmmisaAhyɛnsode}}
39.

Find the value of y.

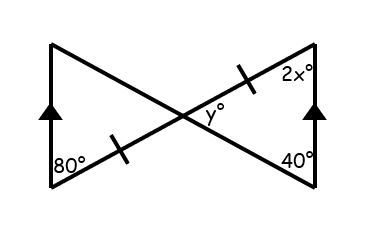
Use the diagram below for the next 2 questions.
1
Asemmisa {{asɛmmisaAhyɛnsode}}
40.

Find the value of x.

1
Asemmisa {{asɛmmisaAhyɛnsode}}
41.

Find the value of y.

Asemmisa {{asɛmmisaAhyɛnsode}}
42.

What does CPCTC stand for?

Asemmisa {{asɛmmisaAhyɛnsode}}
43.

Put the statements in the correct order to complete the proof.
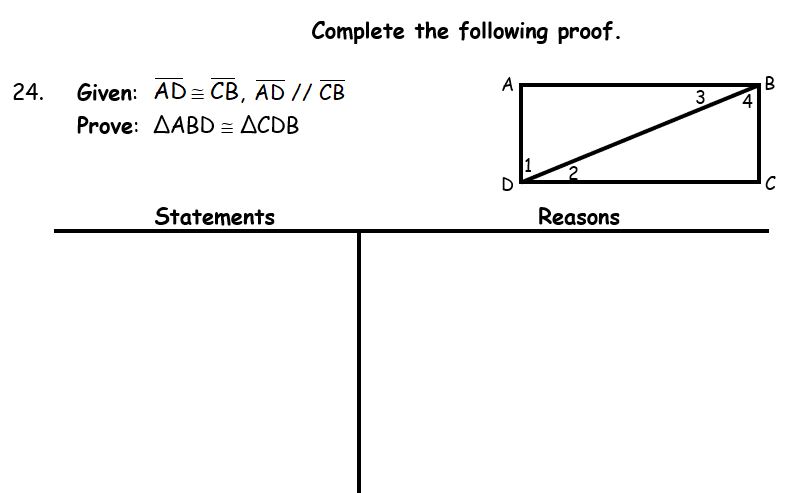
  1. \angle{1} \cong \angle{4}

  2. \triangle ABD \cong \triangle CDB

  3. DB \cong DB

  4. AD \parallel CB

  5. AD \cong CB

Using the correct order of the proof completed above, state the reasons for each step.
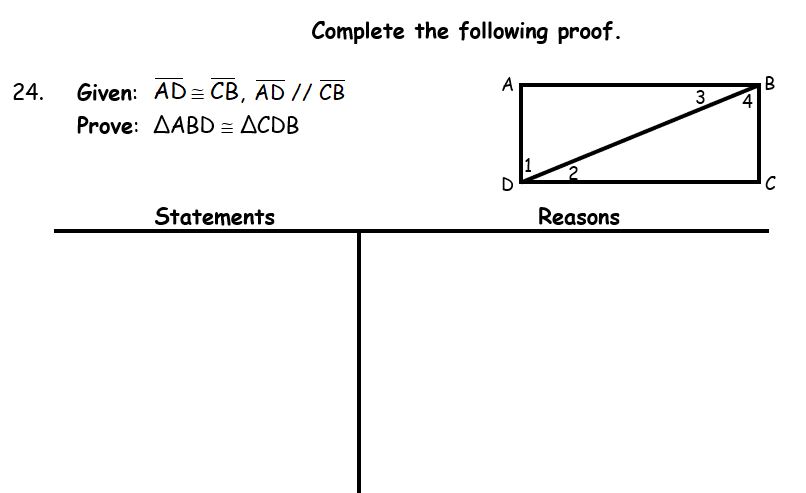
1
Asemmisa {{asɛmmisaAhyɛnsode}}
44.

Reason #1

1
Asemmisa {{asɛmmisaAhyɛnsode}}
45.

Reason #2

1
Asemmisa {{asɛmmisaAhyɛnsode}}
46.

Reason #3

1
Asemmisa {{asɛmmisaAhyɛnsode}}
47.

Reason #4

1
Asemmisa {{asɛmmisaAhyɛnsode}}
48.

Reason #5

Asemmisa {{asɛmmisaAhyɛnsode}}
49.

Put the statements in the correct order to complete the proof.
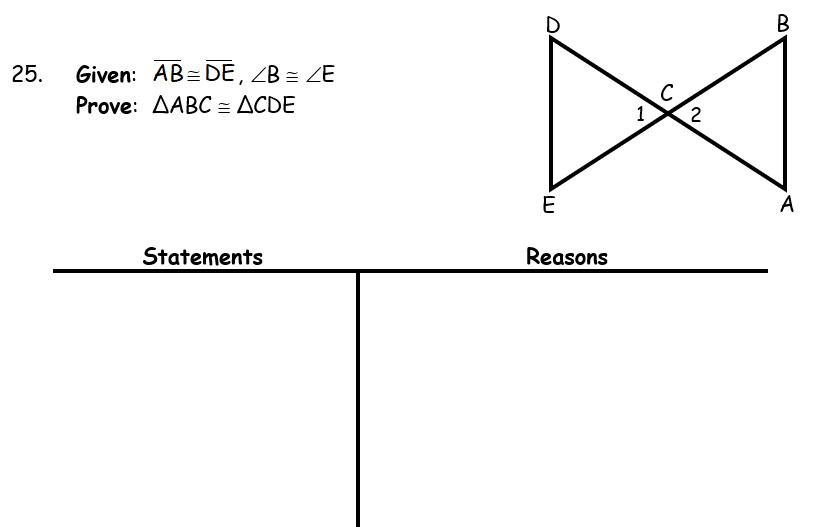
  1. \angle{B} \cong \angle{E}

  2. \triangle ABC \cong \triangle CDE

  3. \angle{1} \cong \angle{2}

  4. AB \cong DE

Using the correct order of the proof completed above, state the reasons for each step.
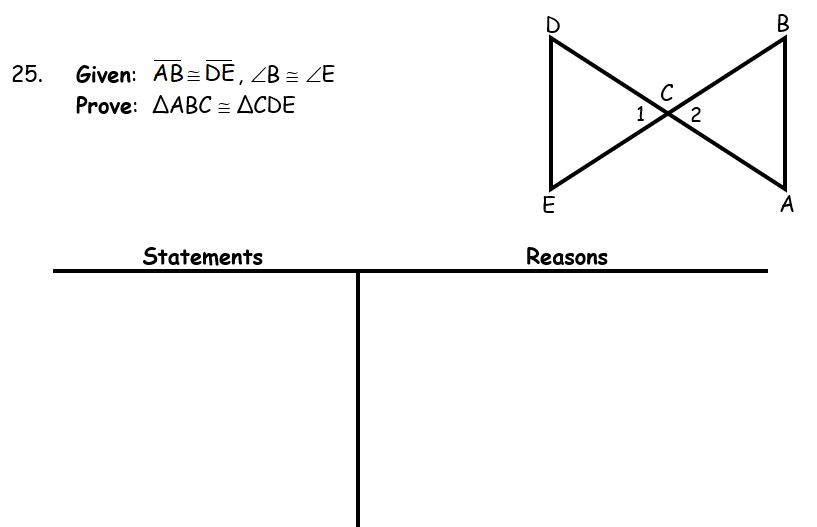
1
Asemmisa {{asɛmmisaAhyɛnsode}}
50.

Reason #1

1
Asemmisa {{asɛmmisaAhyɛnsode}}
51.

Reason #2

1
Asemmisa {{asɛmmisaAhyɛnsode}}
52.

Reason #3

1
Asemmisa {{asɛmmisaAhyɛnsode}}
53.

Reason #4

Asemmisa {{asɛmmisaAhyɛnsode}}
54.

Put the statements in the correct order to complete the proof.
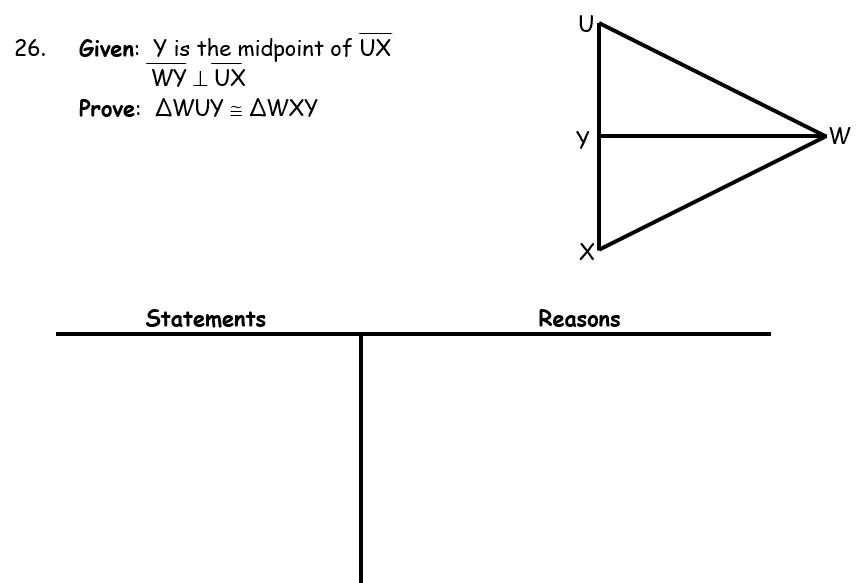
  1. \angle{UYW} \cong \angle{XYW}

  2. \triangle WUY \cong \triangle WXY

  3. UY \cong XY

  4. YW \cong YW

  5. WY \perp UX

  6. Y is the midpoint of UX

  7. \angle{UYW} and \angle{XYW} are right angles

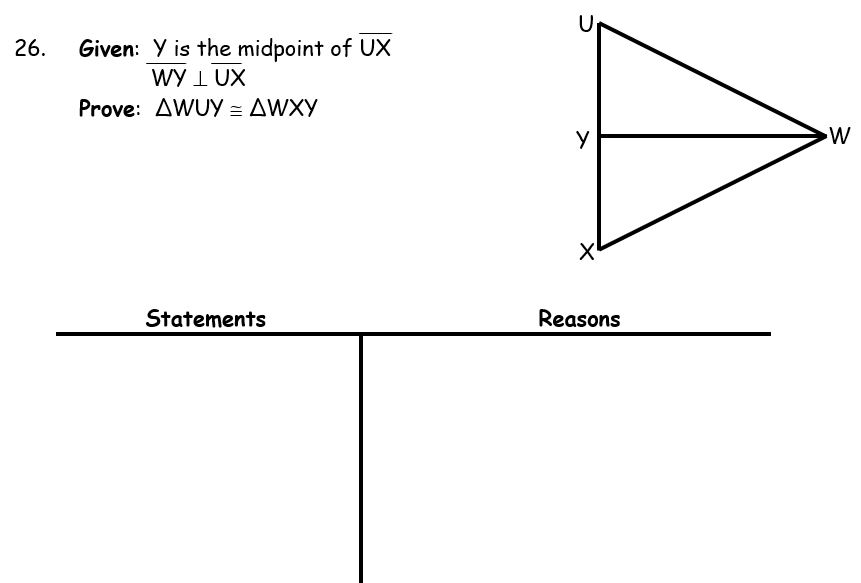
Using the correct order of the proof completed above, state the reasons for each step.
1
Asemmisa {{asɛmmisaAhyɛnsode}}
55.

Reason #1

1
Asemmisa {{asɛmmisaAhyɛnsode}}
56.

Reason #2

1
Asemmisa {{asɛmmisaAhyɛnsode}}
57.

Reason #3

1
1
1
1
Asemmisa {{asɛmmisaAhyɛnsode}}
62.

Put the statements in the correct order to complete the proof.
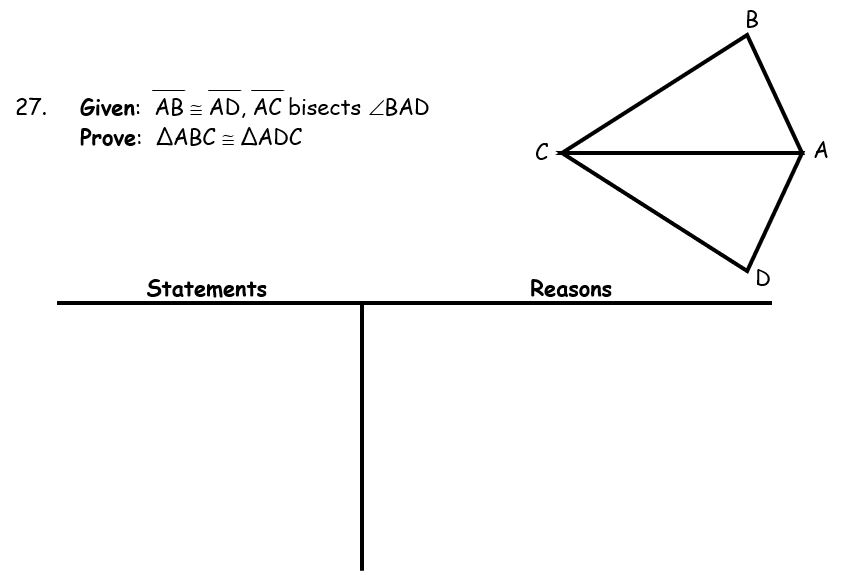
  1. \triangle ABC \cong \triangle ADC

  2. AC bisects \angle{BAD}

  3. AB \cong AD

  4. \angle{BAC} \cong \angle{DAC}

  5. CA \cong CA

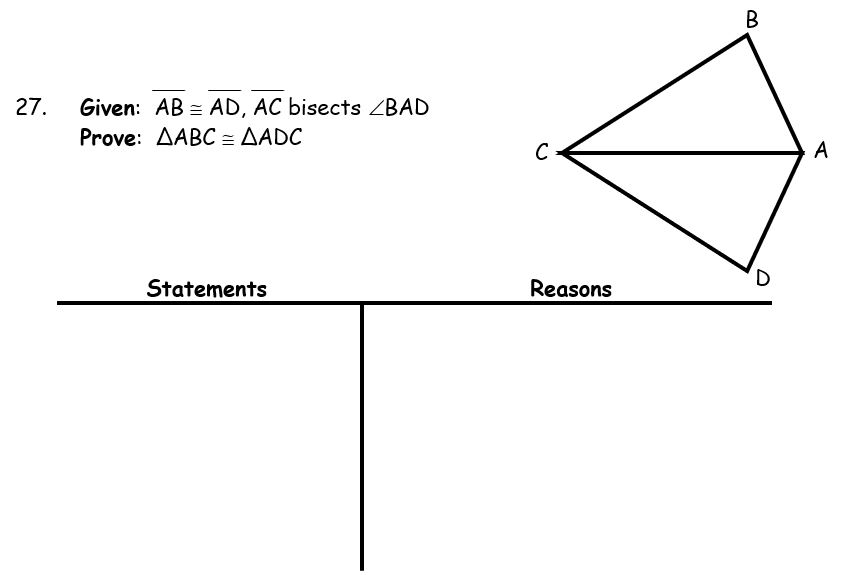
Using the correct order of the proof completed above, state the reasons for each step.
1
Asemmisa {{asɛmmisaAhyɛnsode}}
63.

Reason #1

1
Asemmisa {{asɛmmisaAhyɛnsode}}
64.

Reason #2

1
Asemmisa {{asɛmmisaAhyɛnsode}}
65.

Reason #3

1
Asemmisa {{asɛmmisaAhyɛnsode}}
66.

Reason #4

1
Asemmisa {{asɛmmisaAhyɛnsode}}
67.

Reason #5

Asemmisa {{asɛmmisaAhyɛnsode}}
68.

Put the statements in the correct order to complete the proof.
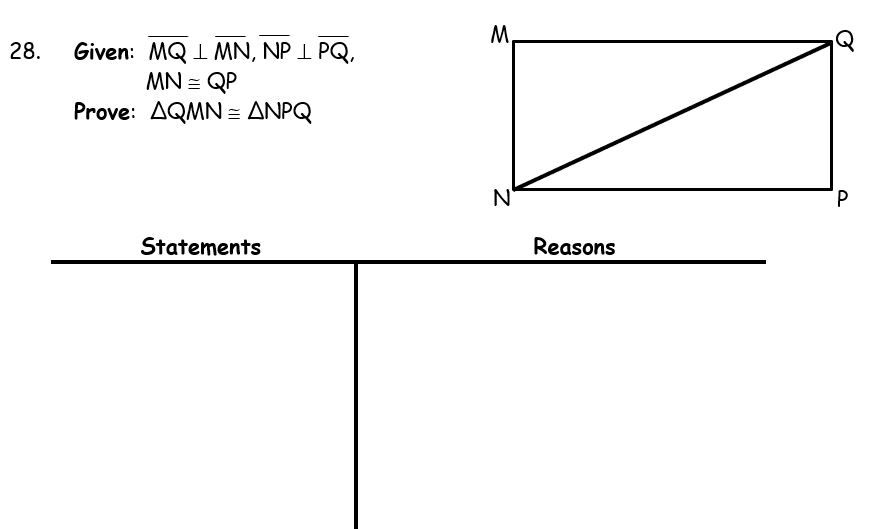
  1. \angle{M} and \angle{P} are right angles

  2. \angle{M} \cong \angle{P}

  3. NQ \cong NQ

  4. MQ \perp MN, NP \perp PQ

  5. MN \cong QP

  6. \triangle QMN \cong \triangle NPQ

Using the correct order of the proof completed above, state the reasons for each step.
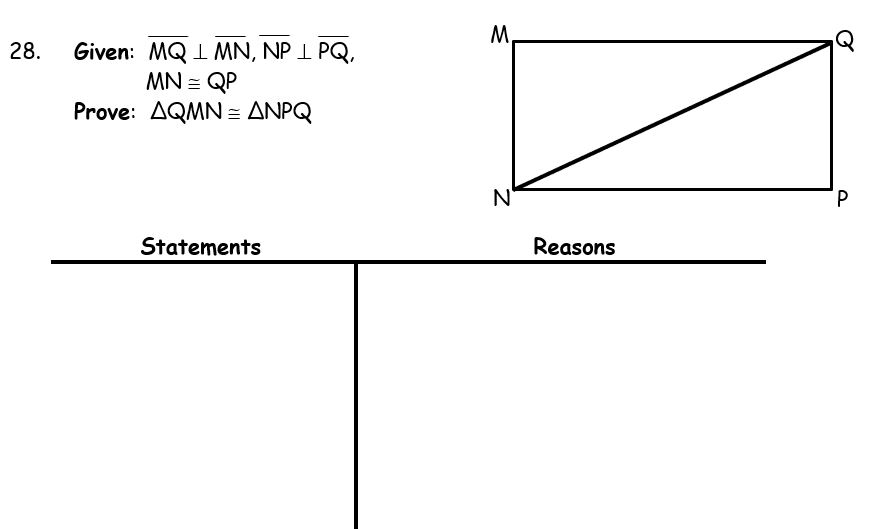
1
Asemmisa {{asɛmmisaAhyɛnsode}}
69.

Reason #1

1
Asemmisa {{asɛmmisaAhyɛnsode}}
70.

Reason #2

1
Asemmisa {{asɛmmisaAhyɛnsode}}
71.

Reason #3

1
Asemmisa {{asɛmmisaAhyɛnsode}}
72.

Reason #4

1
1
Asemmisa {{asɛmmisaAhyɛnsode}}
75.

Put the statements in the correct order to complete the proof.
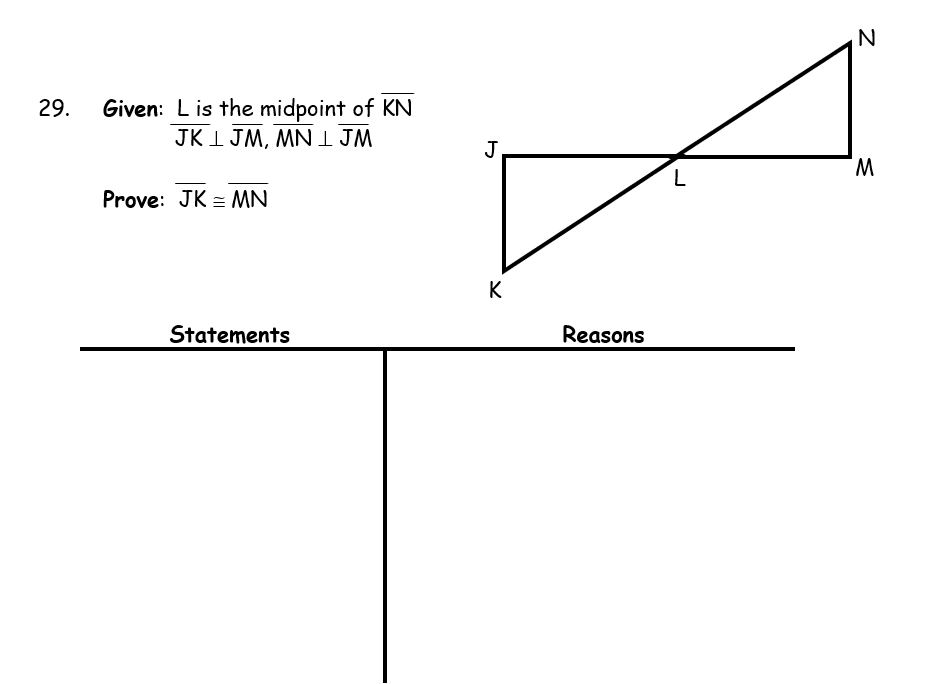
  1. \angle{J} \cong \angle{M}

  2. KL \cong NL

  3. \triangle KJL \cong \triangle NML

  4. \angle{J} and \angle{M} are right angles

  5. L is the midpoint of KN

  6. JK \cong MN

  7. JK \perp JM, MN \perp JM

  8. \angle{JLK} \cong \angle{MLN}

Using the correct order of the proof completed above, state the reasons for each step.
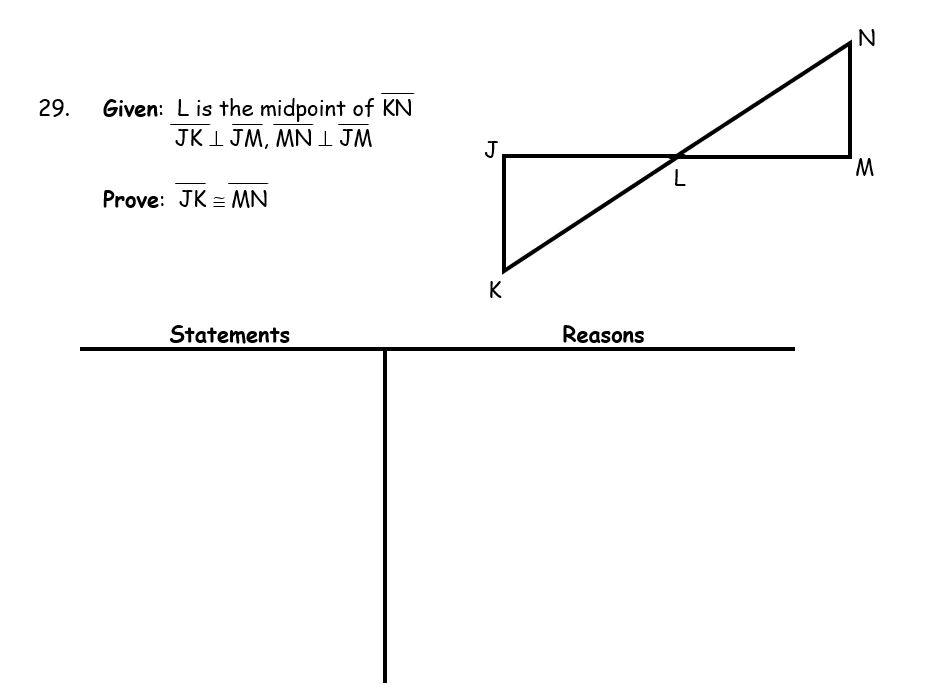
1
Asemmisa {{asɛmmisaAhyɛnsode}}
76.

Reason #1

1
Asemmisa {{asɛmmisaAhyɛnsode}}
77.

Reason #2

1
1
1
1
1
1
Asemmisa {{asɛmmisaAhyɛnsode}}
84.

Put the statements in the correct order to complete the proof.
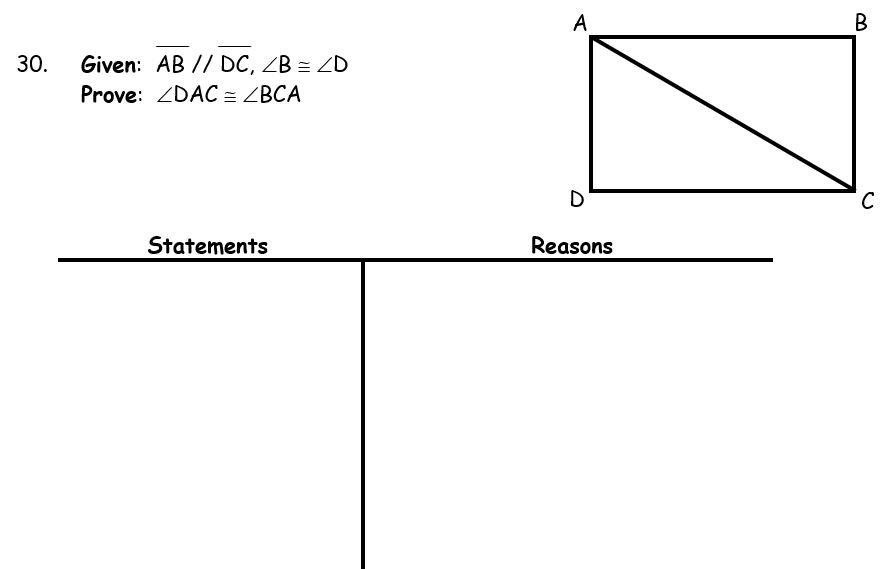
  1. AB \parallel DC

  2. \angle{1} \cong \angle{2}

  3. AC \cong AC

  4. \triangle ADC \cong \triangle CBA

  5. \angle{DAC} \cong \angle{BCA}

  6. \angle{B} \cong \angle{D}

Using the correct order of the proof completed above, state the reasons for each step.
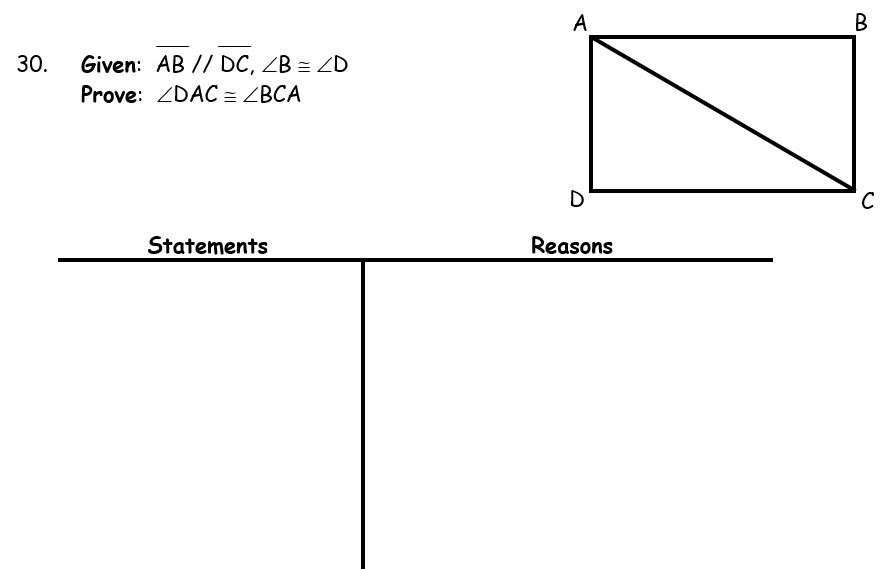
1
Asemmisa {{asɛmmisaAhyɛnsode}}
85.

Reason #1

1
Asemmisa {{asɛmmisaAhyɛnsode}}
86.

Reason #2

1
Asemmisa {{asɛmmisaAhyɛnsode}}
87.

Reason #3

1
Asemmisa {{asɛmmisaAhyɛnsode}}
88.

Reason #4

1
1
Asemmisa {{asɛmmisaAhyɛnsode}}
91.

Put the statements in the correct order to complete the proof.
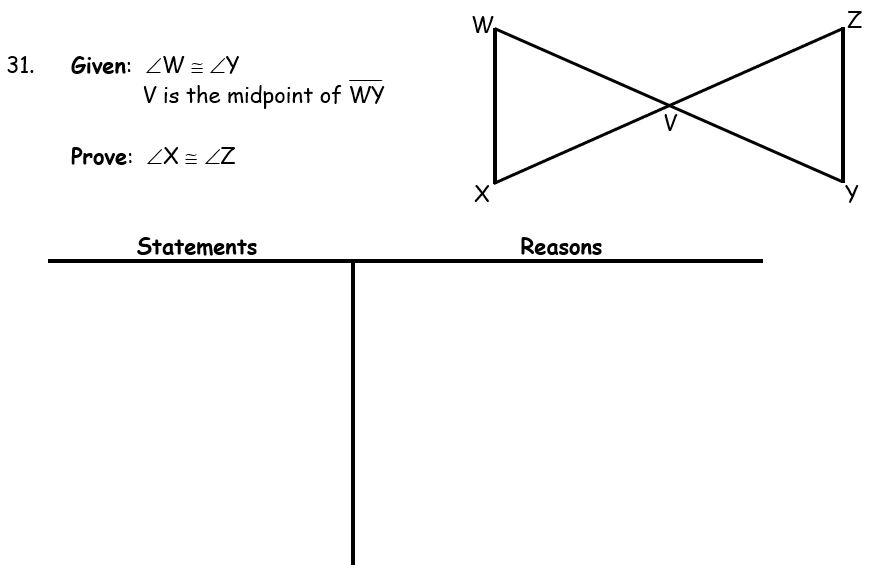
  1. V is the midpoint of WY

  2. \angle{W} \cong \angle{Y}

  3. WV \cong VY

  4. \angle{WVX} \cong \angle{ZVY}

  5. \angle{X} \cong \angle{Z}

  6. \triangle WXV \cong \triangle YZV

Using the correct order of the proof completed above, state the reasons for each step.
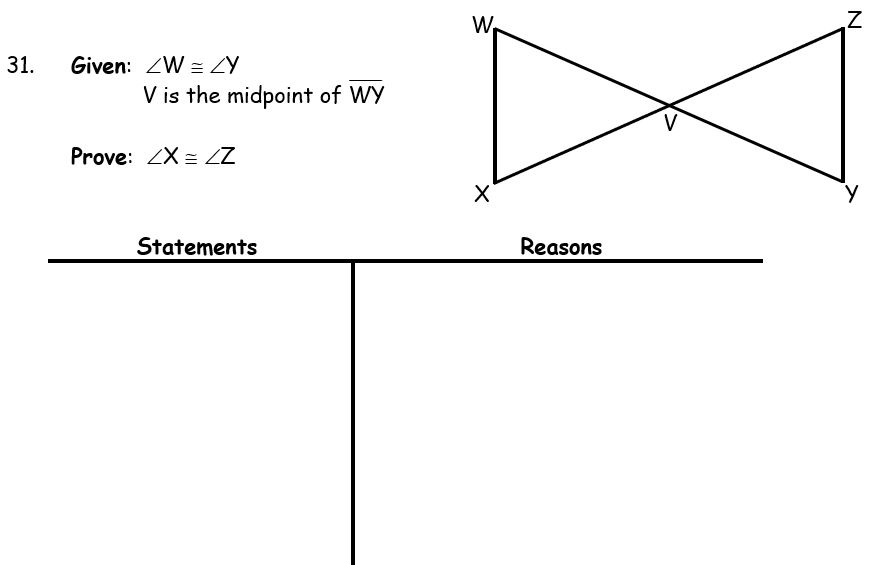
1
Asemmisa {{asɛmmisaAhyɛnsode}}
92.

Reason #1

1
Asemmisa {{asɛmmisaAhyɛnsode}}
93.

Reason #2

1
Asemmisa {{asɛmmisaAhyɛnsode}}
94.

Reason #3

1
Asemmisa {{asɛmmisaAhyɛnsode}}
95.

Reason #4

1
1
Asemmisa {{asɛmmisaAhyɛnsode}}
5.

\triangle{STR} \cong \triangle{}_______

Asemmisa {{asɛmmisaAhyɛnsode}}
6.

\angle{L} \cong \angle{} _______

Asemmisa {{asɛmmisaAhyɛnsode}}
8.

Congruence Statement. Do not write "Triangle" and use "=" for congruence

Asemmisa {{asɛmmisaAhyɛnsode}}
10.

Congruence Statement. Do not write "Triangle" and use "=" for congruence

Asemmisa {{asɛmmisaAhyɛnsode}}
12.

Congruence Statement. Do not write "Triangle" and use "=" for congruence

Asemmisa {{asɛmmisaAhyɛnsode}}
14.

Congruence Statement. Do not write "Triangle" and use "=" for congruence

Asemmisa {{asɛmmisaAhyɛnsode}}
16.

Congruence Statement. Do not write "Triangle" and use "=" for congruence

Asemmisa {{asɛmmisaAhyɛnsode}}
18.

Congruence Statement. Do not write "Triangle" and use "=" for congruence

Asemmisa {{asɛmmisaAhyɛnsode}}
34.

\triangle{CAB} \cong \triangle{}_______

Asemmisa {{asɛmmisaAhyɛnsode}}
35.

\angle{C} \cong \angle{} _______

Asemmisa {{asɛmmisaAhyɛnsode}}
58.

Reason #4

Asemmisa {{asɛmmisaAhyɛnsode}}
59.

Reason #5

Asemmisa {{asɛmmisaAhyɛnsode}}
60.

Reason #6

Asemmisa {{asɛmmisaAhyɛnsode}}
61.

Reason #7

Asemmisa {{asɛmmisaAhyɛnsode}}
73.

Reason #5

Asemmisa {{asɛmmisaAhyɛnsode}}
74.

Reason #6

Asemmisa {{asɛmmisaAhyɛnsode}}
78.

Reason #3

Asemmisa {{asɛmmisaAhyɛnsode}}
79.

Reason #4

Asemmisa {{asɛmmisaAhyɛnsode}}
80.

Reason #5

Asemmisa {{asɛmmisaAhyɛnsode}}
81.

Reason #6

Asemmisa {{asɛmmisaAhyɛnsode}}
82.

Reason #7

Asemmisa {{asɛmmisaAhyɛnsode}}
83.

Reason #8

Asemmisa {{asɛmmisaAhyɛnsode}}
89.

Reason #5

Asemmisa {{asɛmmisaAhyɛnsode}}
90.

Reason #6

Asemmisa {{asɛmmisaAhyɛnsode}}
96.

Reason #5

Asemmisa {{asɛmmisaAhyɛnsode}}
97.

Reason #6