The Panels: Identify the icon that represents the Entity Info panel in the image below.
The Panels: Identify the icon that represents the Entity Info panel in the image below.

This activity is inspired by the SketchUp for Schools Curriculum lesson of the same name.
Model the SketchUp step box logo and learn the basics of how to build a model for 3D printing.
This activity is inspired by the SketchUp for Schools Curriculum lesson of the same name.
Model the SketchUp step box logo and learn the basics of how to build a model for 3D printing.
Sign in at SketchUp for Schools.
Create a new model.
Title your model so that it includes your name and this lesson's title.
Watch the video below and respond to the questions and prompts found in this Formative activity. As techniques are demonstrated, complete them in your own model. You will capture screenshots of your project and submit them at built-in checkpoints along the way. Pause and rewind as often as necessary.
Consider exploring this supplementary slide deck as well: SketchUp for Schools 3D Printing Guide
Efficient strategies may include tab-hopping, side-by-side windows, using multiple screens/devices, etc.
The SketchUp interface includes a variety of menus and toolbars that provide access to its many tools and resources. You can find helpful reference documentation regarding each of the items in these menus at the very end of this Formative activity.
Match each file type with its description.
| Stavka koja se može prevući | arrow_right_alt | Odgovarajuća stavka |
|---|---|---|
.png | arrow_right_alt | The file type of an entire SketchUp project. Files like this can be used to open, explore, and edit models in SketchUp. |
.skp | arrow_right_alt | The file type that allows a SketchUp model to be imported into 3D printing software. |
.stl | arrow_right_alt | The file type of most Chromebook screenshots. This is only a basic, 2D image file. |
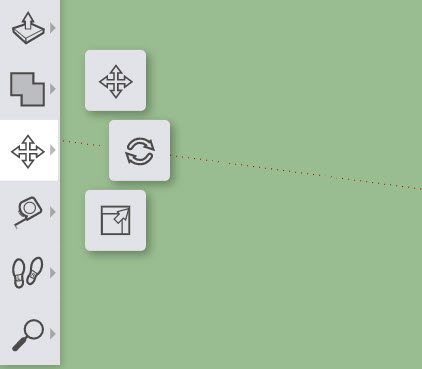
The Panels: Identify the icon that represents the Entity Info panel in the image below.
What two things should you look for in the Entity Info panel to ensure that you have a watertight model.
Move Tools: Identify the icon that represents the Scale tool in the image below.
The Toolbar: Match each icon from the toolbar with the tool that it represents. You may need to zoom out to see all of the items. You can also place each item from the left column by selecting it (click it) then selecting (clicking on) the match for it in the right column.
| Stavka koja se može prevući | arrow_right_alt | Odgovarajuća stavka |
|---|---|---|
| arrow_right_alt | Select | |
| arrow_right_alt | Erase | |
| arrow_right_alt | Paint Bucket | |
| arrow_right_alt | Move Objects | |
| arrow_right_alt | Draw Shapes | |
| arrow_right_alt | Measure Tools | |
| arrow_right_alt | Camera Controls | |
| arrow_right_alt | Draw Lines |
Which tool will reset the zoom level of your model back to its defaults?
This is the tool to use if you find that you have zoomed way too far in or out.
Camera Controls: Identify the icon that represents the Zoom Extents tool in the image below.
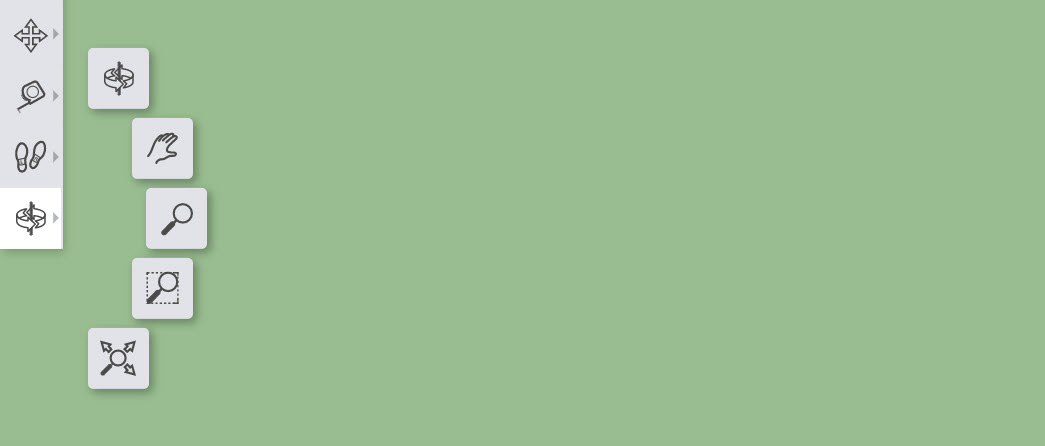
Camera Controls: Identify the icon that represents the Orbit tool in the image below.
Camera Controls: Identify the icon that represents the Zoom tool in the image below.
Camera Controls: Identify the icon that represents the Pan tool in the image below.
The panels include components, materials, and the instructor. By default, the panels can be found on the of the SketchUp screen.
True or False: You will need to click Save near the top left to save your project. It is recommended that you save often so you don't lose the progress you've made.
💾 Download your completed model as an SKP file and upload it here.
🧠 Retrieval Practice:
Summarize the content of this lesson. What topics, ideas, tools, and vocabulary were introduced?
Home

Toolbars

Panels

Status Bar

Measurements

Checkpoint: [🎵 It's hip to be] square
Make sure you have completed all of the steps demonstrated so far in your own project.
Establish an appropriate view of your recent progress and capture a screenshot.
Upload the screenshot to the Formative canvas and zoom and pan as needed.
Checkpoint: Congratulations, it's a box!
Establish an appropriate view of your recent progress and capture a screenshot.
Upload the screenshot to the Formative canvas and zoom and pan as needed.
Checkpoint: Steps drawn flat
Establish an appropriate view of your recent progress and capture a screenshot.
Upload the screenshot to the Formative canvas and zoom and pan as needed.
Checkpoint: Steps!
Establish an appropriate view of your recent progress and capture a screenshot.
Upload the screenshot to the Formative canvas and zoom and pan as needed.
Checkpoint: Colored 3D logo
Establish an appropriate view of your recent progress and capture a screenshot.
Upload the screenshot to the Formative canvas and zoom and pan as needed.
Checkpoint: Grouped!
Establish an appropriate view of your recent progress and capture a screenshot.
Upload the screenshot to the Formative canvas and zoom and pan as needed.
Checkpoint: Smaller than a foot
Establish an appropriate view of your recent progress and capture a screenshot. Capture the human model's foot in your screenshot to establish scale.
Upload the screenshot to the Formative canvas and zoom and pan as needed.
💾 Export your logo model as an STL file and upload it here.
⚠️ NOTE: If the STL filetype is not available in the Export menu, check the Download menu.