
This course includes resources provided by the following:
Joe Olayvar & Evelyn Lindberg in association with the Washington State Library
Carnegie Mellon Robotics Academy from Carnegie Mellon University
📕 Click here to access the LEGO Mindstorms EV3 Programming Basics document in its entirety.
▶️ Click here to access the entire LEGO Mindstorms EV3 YouTube playlist from the Washington State Library.
🎓 Click here to access the free online EV3 course from Carnegie Mellon University.
Before you continue, ensure that you have completed the following builds:
Color Sensor (aka Color Sensor Down)
Before continuing, ensure that you have added the following app to your Chromebook:
LEGO® MINDSTORMS® Education EV3
No Chromebook? No problem! Similar software is available for a variety of platforms. See the LEGO MINDSTORMS software downloads page for details.
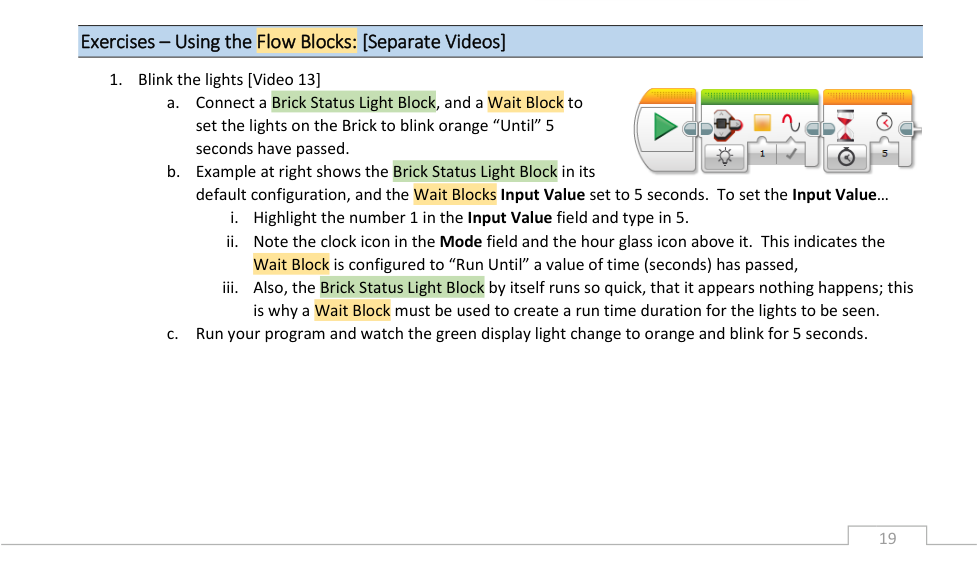
Blink the Lights
Within your EV3 programming software, connect a brick status light block and a wait block to the start block on the canvas.
Configure the blocks as follows:
Brick Status Light: Defaults
Wait: Input: 5
Rotations: 1
OTHERS: default settings
Run your program to ensure that it performs as expected.
📸 Document It: Capture a screenshot of your completed program and upload or paste it onto the Formative canvas.
Color Sensor Stop
Within your EV3 programming software, connect a steering block and a wait block to the start block on the canvas.
Configure the blocks as follows:
Steering: ON, 30 power
Wait: Until the color sensor sees the color of a tape you have that contrasts with the driving surface. (For example, white tape against a dark tile floor.)
Run your program to ensure that it performs as expected.
📸 Document It: Capture a screenshot of your completed program and upload or paste it onto the Formative canvas.
⚙️ Modify it
1. Notice the stopping action of your robot when it reaches the stopping line.
2. Now, add a steering block after the wait block. Set this new steering block to OFF. Run the program again and observe the stopping action.
3. Next, change the Mode of the new steering block from OFF to COAST (X). Run the program and note the stopping action
Describe the first stopping behavior (without the second steering block).
Describe the second stopping behavior (with a second steering block set to OFF).
Describe the third stopping behavior (with the second steering block set to COAST).
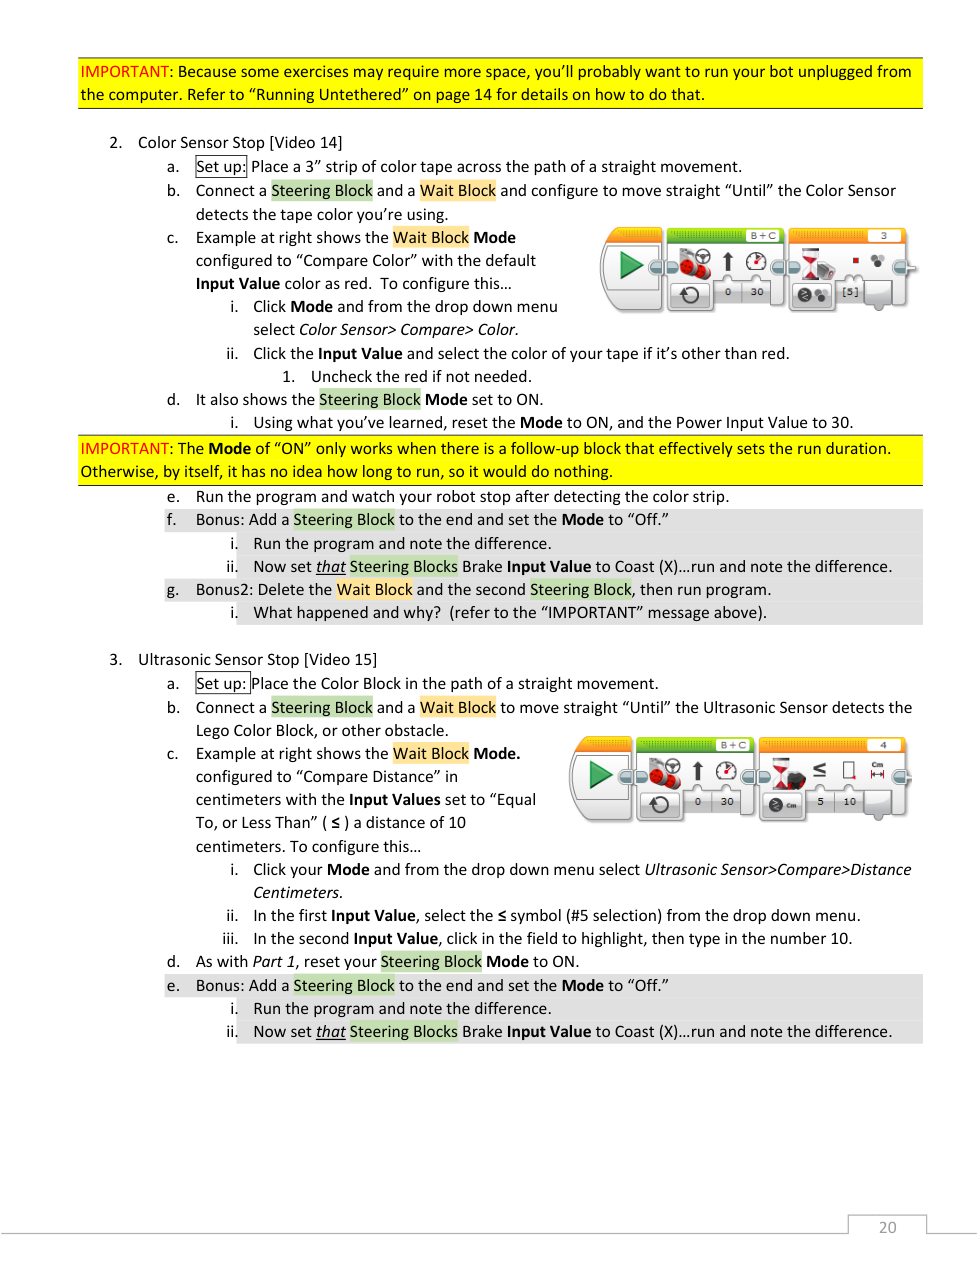
Ultrasonic Sensor Stop
Within your EV3 programming software, connect a steering block and a wait block to the start block on the canvas.
Configure the blocks as follows:
Steering: ON, 30 power
Wait: Until the ultrasonic sensor sees an object that is less than or equal to 10 centimeters away.
Place the Color Block (aka cuboid) in the path directly ahead of your robot and more than 10 centimeters away. Run your program to ensure that it performs as expected.
📸 Document It: Capture a screenshot of your completed program and upload or paste it onto the Formative canvas.
⚙️ Modify it
1. Notice the stopping action of your robot when it reaches the stopping line.
2. Now, add a steering block after the wait block. Set this new steering block to COAST (X). Run the program again and observe the stopping action.
Describe the first stopping behavior (without the second steering block).
Describe the second stopping behavior (with the second steering block added and set to COAST).
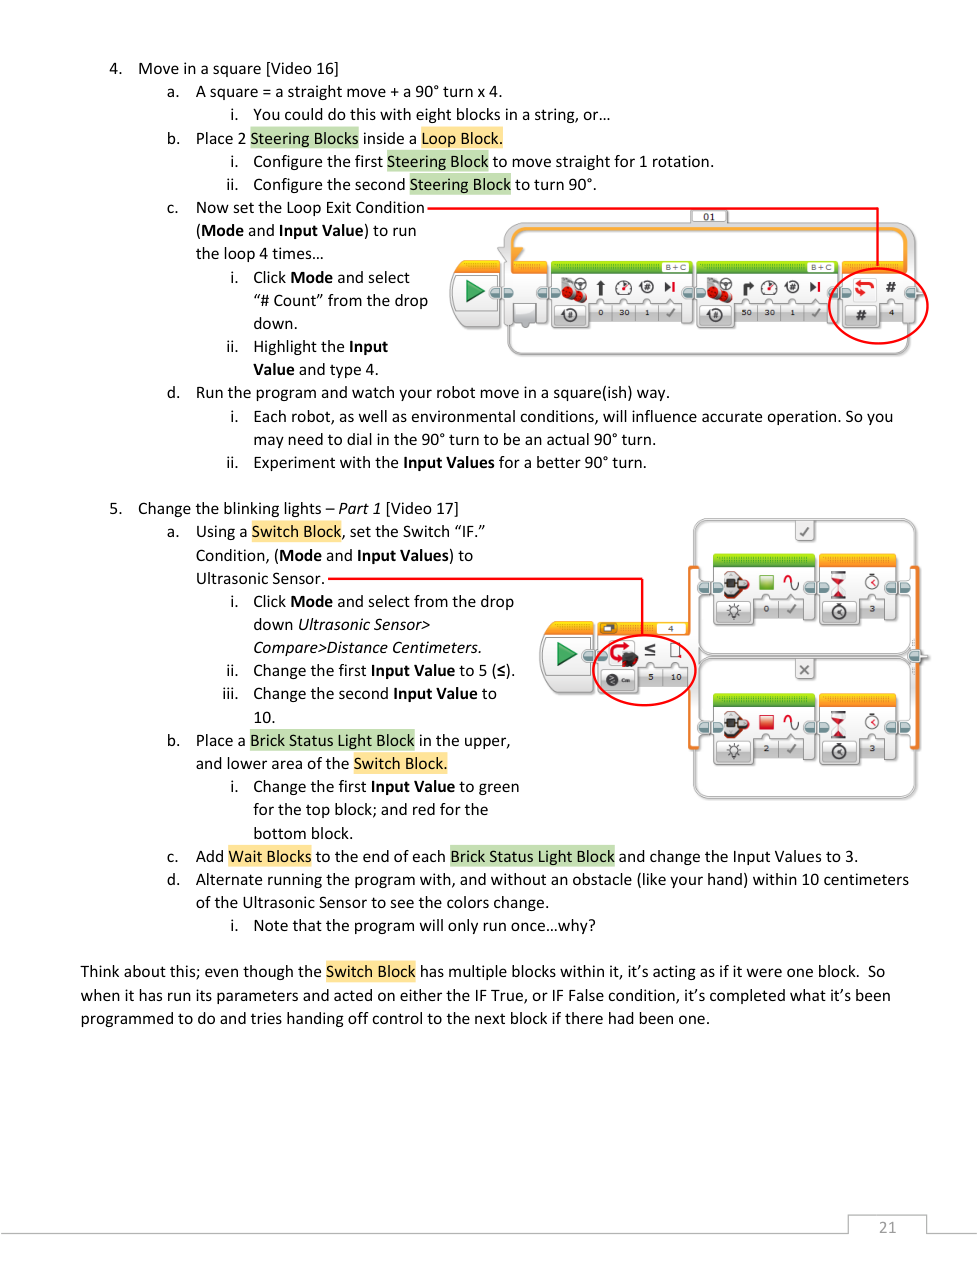
Move in a Square
Within your EV3 programming software, connect a loop block to the start block on the canvas. Place two linked steering blocks inside the loop.
Configure the blocks as follows:
Steering block 1: 30 power, 1 rotation
Steering block 2: 30 power, turn right 90 degrees
Loop exit condition: Mode: # Count, Input: 4
Run your program to ensure that it performs as expected. Make any adjustments that are needed.
📸 Document It: Capture a screenshot of your completed program and upload or paste it onto the Formative canvas.
Change the blinking lights - Part 1
Within your EV3 programming software, connect a switch block to the start block on the canvas. Place a brick status light block and a wait block in both the upper/true area and the lower/false area of the switch block.
Configure the blocks as follows:
Switch: IF condition: Ultrasonic Sensor: Compare distance: less than or equal to 10 centimeters.
IF true: brick status light green for 3 seconds
IF false: brick status light red for 3 seconds
Run your program with your hand close to the ultrasonic sensor and again with no obstacles within 10 centimeters. Note the different behaviors.
📸 Document It: Capture a screenshot of your completed program and upload or paste it onto the Formative canvas.
❓ This program only runs once. Why is that? How could you change that?
💡 Think about this: Even though the Switch Block has multiple blocks within it, it’s acting as if it were one block. So when it has run its parameters and acted on either the IF True or IF False condition, it’s completed what it’s been programmed to do and tries handing off control to the next block if there had been one.
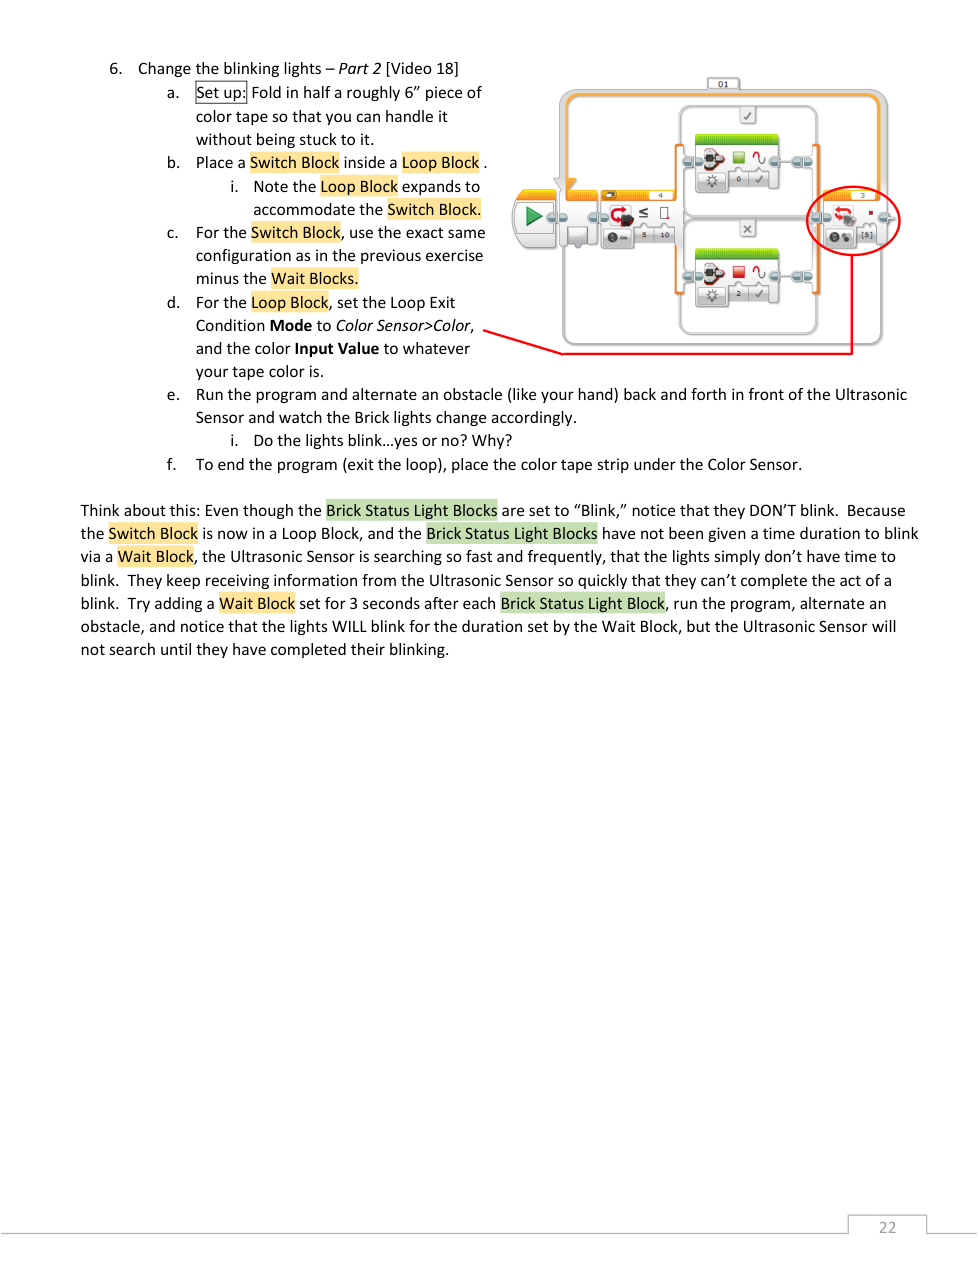
Change the blinking lights - Part 2
Connect a loop block to the start block. Add a switch block within the loop block. Add a brick status light block to the true and false areas of the switch block.
Configure the blocks as follows:
Loop exit condition: The color sensor sees the color of a contrasting tape you have for this activity.
Switch: IF condition: Ultrasonic Sensor: Compare distance: less than or equal to 10 centimeters.
IF true: brick status light green for 3 seconds
IF false: brick status light red for 3 seconds
Run your program while placing your hand close to the ultrasonic sensor and removing it, with no obstacles within 10 centimeters. Note the different behaviors.
To end the program (exit the loop), carefully place a piece of tape that matches the loop exit condition underneath the color sensor.
📸 Document It: Capture a screenshot of your completed program and upload or paste it onto the Formative canvas.
💡 Think about this: Even though the Brick Status Light Blocks are set to “Blink,” notice that they DON’T blink. Because the Switch Block is now in a Loop Block, and the Brick Status Light Blocks have not been given a time duration to blink via a Wait Block, the Ultrasonic Sensor is searching so fast and frequently, that the lights simply don’t have time to blink. They keep receiving information from the Ultrasonic Sensor so quickly that they can’t complete the act of a blink. Try adding a Wait Block set for 3 seconds after each Brick Status Light Block, run the program, alternate an obstacle, and notice that the lights WILL blink for the duration set by the Wait Block, but the Ultrasonic Sensor will not search until they have completed their blinking.
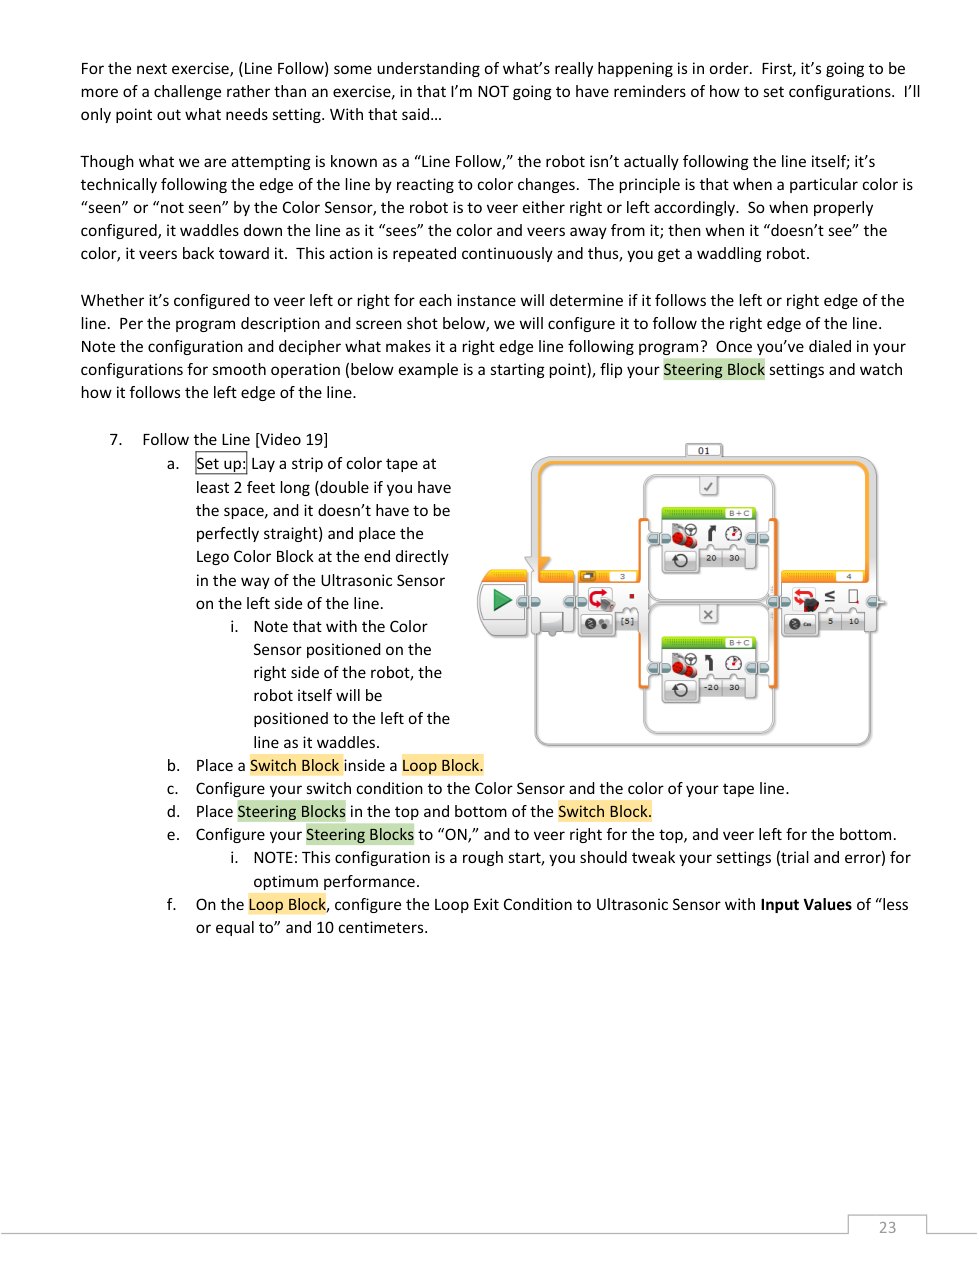
Follow the Line
Course set up: Lay a strip of contrasting-colored tape at least 2 feet long and place the LEGO Color Block (cuboid) at the end directly in the way of the Ultrasonic Sensor on the left side of the tape line.
Note that with the Color Sensor positioned on the right side of the robot, the robot itself will be positioned to the left of the line as it waddles.
Connect a loop block to the start block. Add a switch block within the loop block. Add a steering block to the upper/true and lower/false areas of the switch block.
Configure the blocks as follows:
Loop exit condition: Ultrasonic Sensor: Compare distance: less than or equal to 10 centimeters.
Switch IF condition: The color sensor sees the color of the contrasting tape line.
IF true: steering veer right (20), power 30
IF false: steering veer left (-20), power 30
NOTE: This configuration is a rough start, you should adjust your settings (trial and error) for optimum performance.
The robot should end the program (exit the loop) when it senses the cuboid within 10 centimeters of the ultrasonic sensor.
📸 Document It: Capture a screenshot of your completed program and upload or paste it onto the Formative canvas.
Challenge: Moving Product
You have learned what the Green Action and the Orange Flow Blocks do, how they are the same and yet different, and how they all work in concert. Now, we are going to put what you have learned to some practical use.
In the “Programming Workflow” section (page 9), the “Basic Programming Flow Model” was described and the “Pseudo Programming” was outlined. This challenge revisits the idea of pseudo-programming.
Below is a pseudo-program sequence for you to decipher and build your own program solution. Remember to apply the Programming Flow Model as you progress. Everything you need to know has been covered in the previous instructions and exercises, though you will need to tweak some of the settings we used to achieve a few of the goals.
HINT: Less of one thing and more of another will make the sharp 90° turns used in our squares into arcs.
Here is the pseudo-programming for you to decipher:
Starting with the arm raised, follow a line (at least 2’) to the color cube and stop
Lower arm to capture the cube
Reverse in an arc and stop
Raise the arm back up and make a victory sound
After you feel you have conquered the challenge, watch Video 20 (below). It is likely that the solution in the video is at least a bit different than yours. Most challenges have more than one solution.
📸 Document It: Capture a screenshot of your completed program and upload or paste it onto the Formative canvas.
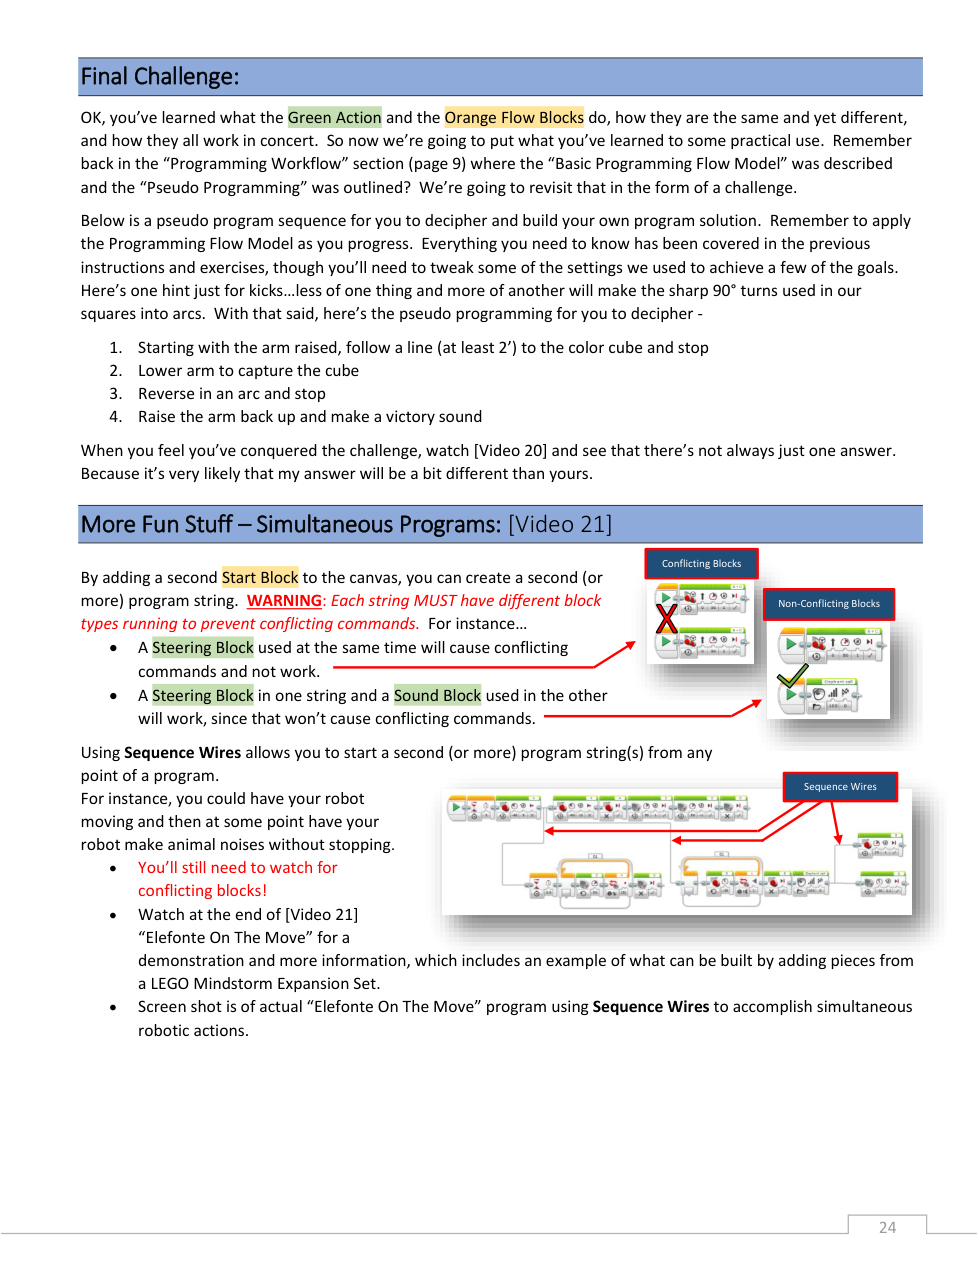
Running Simultaneous Programs
Add a second start block to the canvas.
Configure the program as follows:
Start 1: Steering block: straight forward for 5 seconds, 30 power
Start 2: Sound block: Dog sniff, Wait block: 5 seconds
Run your program to ensure that it performs as expected. Make any adjustments that are needed.
💾 Save this program for use later in this activity.
📸 Document It: Capture a screenshot of your completed program and upload or paste it onto the Formative canvas.
Sequence Wires
Within your previous program, remove the second start block from the canvas. Use sequence wires to connect both program strings to a single start block.
⚠️ Remember that simultaneous program strings will fail if they contain conflicting blocks.
📸 Document It: Capture a screenshot of your completed program and upload or paste it onto the Formative canvas.
🧠 Retrieval Practice:
Summarize the content of this lesson. What topics, ideas, and vocabulary were introduced?